Saturday, November 29, 2014

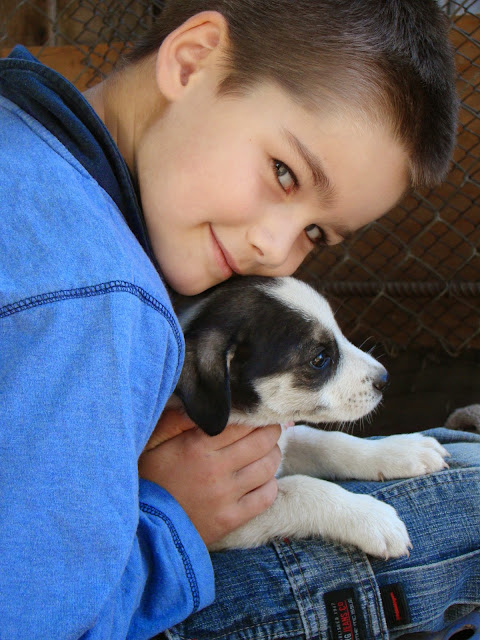
Happy Birthday, William!!


Happy Birthday, William!  I can’t believe you’re 7 whole years old already.  I am SO proud of you — this year your big event was starting local first grade in Russian!  You have done so well, persevering with the writing homework and listening and understanding in class… your teacher told me how pleased she is with what a good student you are. Way to go!


Even more than Russian school, I have been so thankful for the way you are letting Jesus grow your heart.  Recently I noticed you really listening when Daddy points out things about your character - like learning how it feels to let Ben go first, or putting aside what you wanted to do to help your sister - and then later that day or the next day, I see you doing it!  That is the way to grow, Will… listen to correction, and then do it.  I hope you keep this pattern the rest of your life - it will sure help you grow into the young man God created you to be!


I love how attuned you are to God’s creation.  You’re always drawing my attention to a cool rock, or a neat flower, or a new colorful bird.  You notice the way the trees look against the sky, and you think about how things are made and how they work.  You have the mind of a scientist, engineer and poet all wrapped in one.  It’s so amazing watching you unfold!  


I couldn’t ask for a more wonderful first-born son.  I love spending time with you, just the two of us, reading (you love the National Geographic Science readers) or playing games (like chess, checkers, Connect4 and UNO)… you are a “quality time” kind of guy, and I love that about you.

You’re goofy too - you love to groove and beatbox, and your dance moves are legendary.  You like U2, Bluetree, Colin Buchanan and any other hoppin’ beat you can find!  You are a unique, quirky, wonderful kid, and I love you so much.  I love every day I get to be your Mom!  

I hope you have a wonderful, special birthday with your cousins in New Zealand this year, and know how loved and special you are!


XOXO  Love, Mom

Monday, November 24, 2014

Make Your Own Advent Calendar: Finishing Touches

{Are you making your own family Advent Calendar to teach your children the Christmas story?  Good for you!  Time for the finishing touches!  
Click here for Part 1, Part 2, or Part 3…}


Making Your Own Advent Calendar: Finishing Touches


Getting Started…


Gather your supplies:

  • wooden dowel the width of your calendar plus 2" either end for hanging
  • Christmas ribbon for hanging
  • gold felt and red permanent marker for verse, if desired

Add Luke 2:11 to your calendar (Optional)…


1. If desired, cut out a rectangular piece of gold felt the same size as the back of the folded-up storage section of your Advent Calendar.  

2. With a red permanent marker, print Luke 2:11 on the gold rectangle.  

3. Glue the rectangle upside down on the back of your felt background, so when you fold up your storage section the verse will appear right-side up.

Hanging Your Advent Calendar…


1. Sew a straight seam along the safety-pinned allowance at the top of your piece of background felt.


2. Slide the dowel in, making sure it's long enough to stick out 1.5 - 2 inches on each end. (My "dowel" is a backyard stick - I have to trim the knots off first! ;)


3. Tie a pretty Christmas ribbon around each end of the dowel, making sure your knots are tight enough so the ribbon won't slide in towards the center.


4. Hang your Advent Calendar!  

{If you included the verse on the back, it's your choice whether you fold up the storage section every day to show the verse, or whether you leave it unfolded until December 25 and have your kids fold it up for the first time on Christmas Day to display the verse under the finished manger scene.}

*****

{For a free copy of the Christmas story divided into 25 pieces, email me at carolyn@carolynbroughton.com.  


Include a photo of your finished calendar, if you want - I’d love to see it!}
  
*****

Christmas Devotional


Here's the story of my evening four years ago, November 2010, as I carried out the above instructions:

Out back, in our borrowed apple orchard, my husband hacks off a branch for me from one of the little apple trees.  “Long enough?” he asks.  I bring it in, the ice melting off its underside from the warmth of my hand.  Feeling decidedly rustic, I sit with a kitchen knife and chip off buds along its length, smoothing the rough places.  

I choose a reasonably smooth 70cm length from the middle - not too fat, not too thin.  I clip each end with secateurs, try to get a clean cut.  

I slide the stick into the sewn tube at the top of my felt Advent Calendar background.  A bit rough-looking, but it’ll do the job - and I didn’t even slice my finger (came close a couple times, though!).  


I sweep up the shavings, and think about Joseph being a carpenter.  About the beautiful cradle he might have made for Mary’s baby’s birth.  About the simple, rustic manger in which he had to lay Jesus instead, aware at some level that Jesus was much more than his natural son, that He was infinitely special.  

Did Joseph mourn the lowliness of the manger, cursing the Roman decree that dragged them so far away from home at this most inconvenient time?  Or was the manger well-crafted - did Joseph rejoice that the boy to be raised as a carpenter had good carpenter’s craft for his bed?  Did he even think of it at all, so thankful he was for the safe delivery of this precious gift, for a place to lay the baby that lifted him off the cold dirt floor and the mice and rats?

James and I listen to our Sunday night sermon.  I sew velcro on the backs of “frankincense” and “myrrh”, still missing a square gold button for the “gold”.  No trip to the bazar this morning as planned: everyone sick with colds, huddled up away from the snow, drinking soup and hot tea and taking long naps.  The gold button will have to wait.


My needle pokes and pulls, and John Piper describes the afflictions of Christ, in a sermon from Romans we chose at random.  A Christmas sermon.  Born as an illegitimate child, Jesus carried that slur all his life.  The Pharisees threw it in his face.  Forced to flee as a refugee almost immediately after he was born, barely escaped with his life; spent the first two years of his life sojourning in Egypt, grew up listening to a foreign tongue as his first language.  

“Let’s have a balanced Christmas celebration,” urges Piper, unpacking Romans 12:12: “Rejoice in hope, be patient in tribulation, be constant in prayer.”  Rejoice in hope, Paul says, but that joy is an embattled joy, under constant attack from inside and outside.  Piper quotes the angel’s words, “I bring you good news of GREAT joy!” and adds, “That little baby grew up and said, ‘I have not come to bring peace but a sword… and a person’s enemies will be those of his own household.”  

Sufferings are normal.  If you don’t have any right now, you will.  And the thing is, we rejoice in our sufferings, not just in spite of them, because we know what sufferings do: they produce endurance.  “More than that, we rejoice in our sufferings, knowing that suffering produces endurance, and endurance produces character, and character produces hope, and hope does not put us to shame, because God’s love has been poured into our hearts through the Holy Spirit who has been given to us.”  (Rom. 5:3-5)

So… a worn-out furnace, a broken door lock, a leaky sink, a surprise visit from our landlady when I’m still in my pajamas, relationship struggles, sickness, sleepless nights, feelings of futility and fruitlessness… all these are  actually gifts, to be rejoiced in?


“We have a God who doesn’t just defeat the enemy, but turns that enemy into the servant of our faith.  Every tribulation that comes your way has a design from Satan, and a different design from God,” says Piper.  

“All our tribulation drives the roots of our joy into hope.  For the Christian, the best is always yet to come.  An hour before you die, the best is yet to come.  The minute you wake up on the other side of death, the best is yet to come.  After 10 million years of reveling in God’s presence, the best is still yet to come.  In a profound sense, rejoicing for the Christian will always be in hope: the best is always yet to come!”

I stitch and sew and poke at the buttons for the wise men's gifts, and I think about these gifts the wise men are bringing to Jesus.  I listen to Piper close his sermon by asking, “So, what would the wise men answer when they’re told to “rejoice in hope”?  They’ve got everything: gold, frankincense, nice clothes, elephants to ride on… What does a man like that say when he’s told, “Rejoice in hope”?  When he’s got so much around him to rejoice in?”


Piper answers his own question: 

We are given good gifts to enjoy - but only as gifts from God, and as pointers to God as the ultimate satisfaction of your soul.  All the pleasure in life - sex, food, relationships, thrills, more stuff - is created only to point you to Jesus.  You will barely remember it when what it is pointing to is given you in the age to come.  So don’t embrace the gifts as ends; send your heart flying to the Giver to embrace Jesus as the ultimate joy of your life - then the gifts won’t become idols.”

The goal and ground of my hope is Jesus Himself: the glory of God, shining in the face of Christ.  He is my Gift.  Do I really want Him as my treasure, more than I want anything else this Christmas?  

I glue this verse onto the back of my calendar: “Unto you is born this day… a Savior, who is Christ the Lord.” (Luke 2:11) 


I glue the verse on upside down, since it will hang on the back of the calendar until December 25, when the last piece is put in place and we fold up the bottom of the calendar, now empty, to reveal the verse on the back.  

I think about gifts, and idols, and the Giver, and Advent, the season of waiting for the coming of Christ, the upside-down King of an upside-down kingdom.  

And I remember a quote from Ann I read earlier today:

“Thanksgiving is inherent to a true salvation experience: thanksgiving is necessary to live the well, whole, fullest life.  ‘He who sacrifices thank offerings honors me, and he prepares the way so that I may show him the salvation of God’ (Psalm 50:23 NIV).  Thanksgiving--giving thanks in everything--prepares the way that God might show us his fullest sacrifice in Christ.”  

~Ann Voskamp, One Thousand Gifts

Advent is about preparing the way.  And how best to prepare the way?  To rejoice.  To give thanks, even for trials.  To receive each element of each day, the good, the “bad” and the ugly, as a gift to be given thanks for.  To sacrifice thank offerings. 

Thanks is really the only gift I can give back to Jesus this Christmas, and in giving it daily, my heart will be prepared for seeing God’s showing of His salvation.

I tie red ribbon around the ends of my stick, like I’m wrapping a present, and stand back to look at my finished Advent Calendar: the scene it shows, God’s Gift to us entering the world, is only the beginning.


The Wise Men knew their gifts weren’t enough; they offered them, and then “they bowed low and worshiped.”  

The coming of the Gift invites worship; and the giving of thanks returns worship unto the Giver.  

Merry CHRISTmas!


Monday, November 17, 2014

Make Your Own Advent Calendar, Part 3

{Only two weeks left until December 1st - how's your calendar coming along?  There's still time to get started!  Click here for Part 1 or Part 2 of this series...}

Making Your Own Advent Calendar: Part 3


All your character pieces finished?  Great!  You're ready to make your title and decide on your final spacing.

Getting Started…


Gather your materials:

  • felt for title letters
  • paper patterns for title letters
  • velcro spots
  • craft glue or hot glue gun

Make Your Title…


1. Cut out your title letters.  (I used red felt.)  Hint: Be sure to reverse your paper letter patterns when you trace them onto your felt; that way your black marker lines won't show when you turn them right side up to glue them on your background.


2. Glue your title letters onto your background, using craft glue or a hot glue gun.


Final Spacing…


1. Double-check your final spacing by laying your finished felt pieces into your manger scene, arranging them the way you want them to look.  Mark the bottom of the manger scene with a pen or scrap piece of felt.

2. Then move all the pieces one by one down to the bottom of your background, making sure they all fit.  Leave enough space near each piece to write in each day's number.


3. Reassemble your pieces into the manger scene.  Glue the bristly side of a velcro spot onto each piece, and the corresponding soft side onto the felt background, in the place where you want it to finally stick. (I used two velcro dots on the stable and the double angels.) 

{Hint: Make sure to glue the bristly side of the velcro onto your characters and the soft side onto the background, so when you roll or fold up the background to store it, it won't stick to itself.  Plus, the bristly side of the velcro on the backs of the characters sticks onto the felt itself in the storage spots, so you don't need a second set of velcro backs.}


4. Number each velcro spot for the manger scene and the character storage places with black Sharpie marker.  (Black doesn’t show up that well on my dark green background, but I tried to make the numbers big enough for my preschoolers to find, and when the manger scene is completed it’s nice if the numbers sort of blend in or are covered up anyway.)  Where the character required two velcro spots, I either wrote the same number under both spots, or put the number in between the two spots.

Part 3 complete!  Great job!  You're almost done!


*****
To read the next post in this series, click here… 

{For a copy of the Christmas story divided into 25 pieces, email me at carolyn@carolynbroughton.com}

*****

In the Comments:

How are your calendars coming along?  There’s still time to grab some felt and start cutting and gluing… 

Remember, your calendar can look any way you want it to, ornate or simple - the point is to have something Christ-centered to help your children anticipate Jesus’ birth and learn the Christmas story!  


Leave a comment with your progress… I’d love to see a photo of your calendar when it’s done!

Thursday, November 13, 2014

Freeze-Frame Listening {November thoughts on listening}

{We leave this Friday night for a 2-month stay in New Zealand, catching up with family and friends after a 2-year absence...  Here are my November thoughts on listening, amidst stress and challenges - trying to find the thread of His voice!  For the rest of my monthly thoughts on my One Word for 2014, LISTEN, click here...} 


What if we could just freeze the frame?  What if, in the moment right before I explode in annoyance at my kid, I could freeze that frame of time and - make a different choice?

I’ve been doing a lot of editing recently - movie editing, that is.  We’re getting ready for a home leave in New Zealand and before we go back we usually try and put together a video of current daily life here in Central Asia to show friends and family…  It’s a long process, involving taking footage (and then more footage since the first lot is too wobbly, not high-res, etc, etc), converting all the clips into a format that works with Mac’s awesome iMovie editing program, picking and choosing the pithiest clips, and then… editing.  And editing.  And more editing.  Squeezing each clip down to its essence, and then squeezing even more until just the barest bones are left - glimpses strung together to make a flowing window into our lives.  

Not being ultra-techie, I feel my way along with these projects, and since I don’t use iMovie very often I always have to re-learn everything I learned last time I made a video.  I pick up some new tricks each project, too; recently, I discovered the “freeze frame” option for the first time.  Cool!  You can right-click in the middle of a clip, choose “freeze frame” from the menu, and the program lifts out a frozen frame of that image and sets it apart separately in your timeline.  You can leave it there in the middle of your video clip, a frozen moment, or you can lift it out and put it somewhere else.  

I wish I could do that.  I wish I could freeze-frame the moment just before I yell at my kids, pause everything mid-motion, stop my voice before it explodes out of my mouth, hesitate for a moment, and thinkListen to the Holy Spirit, in that frozen moment.  Tune in.  Calm my beating heart.  Close my eyes and take a deep breath.  

And then speak.  Or act.  Or whatever I need to do.  But I guarantee, after a pause to take a step back, I would probably act differently almost every time. 

Recently, in an attempt to get enculturated for our re-entrance back into Western society, we finally watched the Disney hit “Frozen” as a family.  We liked it; it’s cute, funny,  not scary, and profound in a simple but true way…  

{SPOILER ALERT: if any of you, like us, have also been on another planet and have NOT have watched “Frozen” yet, skip the next paragraph…}  

Our sensitive Will was nearly in tears at the end, when the younger sister Anna, with her last un-frozen breath, steps in front of her older sister to save her from a crossbow arrow, and in the very act her frozen heart finally transforms her completely to ice.  Each of Princess Anna’s fingernails and eyelashes freeze solid into an exquisitely detailed blue-ice statue.  The very moment she saves her sister is literally frozen in time.  

I wish I had a magic wand so I could freeze a moment with a flick of my wrist - just make everything hang stock-still in mid-air, like a movie Pause button, or a crystallized ice-Princess. 

I don’t have a wand.  I just have my imagination.  But I’m learning I can actually imagine pausing my heart / words / thoughts long enough to listen to the Holy Spirit’s quiet whisper in that moment.  

You know, I’ve realized lately that even though I do think of Jesus always being with us, for some reason I usually picture Him as across the room from me: present, but not within reach.  Recently, during a prayer time with a friend, Jesus showed me that He is actually right. next. to. me.  Close enough to whisper in my ear.  Close enough so that even His whisper sounds louder than the world’s hubbub around me.  That’s how close He is, all the timeEvery minute.  Washing dishes, changing a diaper, hosting a friend for tea, breaking up a boys’ fight, walking down the street, talking to my husband, laying down for a nap… Jesus is as close as my breath.  

So, if I can freeze the frame, and remember His nearness, I can focus on listening for His quiet voice.  


And that might make all the difference.

Monday, November 10, 2014

Make Your Own Advent Calendar, Part 2

{Preparing to celebrated Advent with your family?  Why not make your own family Advent Calendar to use year after year?  
For part 1 of this series, click here...} 


I love this story from Noël Piper about their family Advent Calendar:

“Mommy, Mommy!  May I open the next window on the calendar?”  A simple pasteboard Advent calendar with one flap to open on each day in December is probably the most familiar way to help a child understand the wait until Christmas.  In the stores several themes are likely to be available, including Swiss mountain villages and Santa’s workshops.  But since the Advent -- the coming -- we’re waiting for is Christ’s, let’s make sure our daily countdown has a real Christmas setting.

“For our family a more permanent calendar has become a tradition. When our first child was a toddler, I could find hardly any Christmas things that had to do with Jesus.  So I created the Noël Calendar, a burlap banner with plastic and wood figures that by December 25 have been attached with Velcro across the top half of the banner to represent the Christmas story.  Throughout the month, that story is told in increments, starting over at the beginning and adding a bit more each day.  

“The first year we used the calendar, I learned an important lesson: Repetition is an excellent way for a child to memorize.  In mid-December, when Karsten was barely two, my mother-in-law died in a bus crash in Israel.  With little time to plan, we were on our way from Minnesota to South Carolina to take care of my father-in-law, who had been injured.  On an impulse I had tossed the calendar into a suitcase.  In the midst of so much confusion, shock and irregularity, Karsten forgot everything he’d learned about potty training and too much of what he knew about behaving.  But even though he could hardly make a whole sentence on his own yet, he could pick up the Christmas story at any point and keep it going, word for word, as he’d heard it day after day when we did the calendar. 

“...This period in Karsten’s life was the time when I began to realize the place of [repetition and regularity] in my life with my children -- repeating regularly the story that for centuries God’s people had longed to know.  

-Noel Piper, Treasuring God in Our Traditions (emphasis added)

Make Your Own Advent Calendar: Part 2


Getting Started…


1. Gather your materials:

  • colored felt
  • printed out paper patterns for felt shapes
  • sharpie marker
  • scissors
  • Tacky Craft Glue or a hot glue gun
  • safety pins

2. Safety-pin enough allowance at the top of your background piece so you can put a dowel through it later to hang it up.


Check Spacing…


Check to make sure you have room on your background for everything you want to include: 

  • the title - "The Christmas Story"
  • the finished manger scene underneath
  • the 25 storage spots for all the pieces at the bottom

1. Lay out your paper letters for the title “The Christmas Story” at the top of your background piece. 


2. Under the title, lay out your paper patterns for your manger scene, the way you want it to finally appear on Day 25.  Place a pencil or pen horizontally on your background to mark the bottom of the scene.   


3. Next, shift all your pieces down to the lower half of your background (under the pencil) and lay them out in rows, ordering them from #1-25.  At this stage you're checking spacing and proportions to make sure all your characters fit.


Start Making Pieces…


Now you're ready to start making pieces!  

1. First, if you haven't done this already, make a list of your 25 pieces and write down the colors of felt you want to use for the parts of each one. 

2. Then, start with any piece you like.  I started at the beginning, with Mary, and worked my way down the list.

The patterns I found online seemed a bit plump, so I cut them down a little and traced around Mary’s body, head, and head-covering on colored pieces of felt.  Then I glued them together with generous dots of craft glue.  (A hot glue gun would work better, but I didn't have one of those.)


3. I went on to make Joseph, adapting my friend’s patterns to suit what I wanted.

4. Bethlehem came next: a long rectangle of gray felt behind with a brown square on top, with yellow lighted windows and doors.


5. For the animals, I used my friend’s designs for almost all of them.  The only animal I had to draw myself was the camel, and I must admit I'm pretty proud of him!


I used craft glue to attach a small square of velcro on the back of each character.  {PS: After four years of use, the glue still seems fine overall - only an occasional re-glue needed.}

It took me a couple crafting sessions to finish all my pieces… This is the only time-consuming part - the rest is easy!

All your pieces finished?  Congratulations!  You've finished the hardest part!  Keep going!  

To read the next post in this series, click here… 

{For a copy of the Christmas story divided into 25 pieces, email me at carolyn@carolynbroughton.com}


Monday, November 3, 2014

Make Your Own Advent Calendar, Part 1

{This November, I’ll be reposting my popular series, Make Your Own Advent Calendar.  Want to make a calendar for your family this year?  Keep reading to find out how...}


Ever since I came across the idea in Noel Piper's book Treasuring God in Our Traditions, I wanted to make one.  

In her wonderful book, Noël expounds on and gives practical examples of the Piper family belief in creating “God-centered traditions, Bible-saturated family patterns, and grace-laden heirlooms”.  

I couldn’t agree more.  

Here’s how Noël describes the season of Advent:   

“Advent is what we call the season leading up to Christmas.  It begins four Sundays before December 25, sometimes in the last weekend of November, sometimes on the first Sunday in December….  

“For four weeks, it’s as if we’re reenacting, remembering the thousands of years during which God’s people were anticipating and longing for the coming of God’s salvation, for Jesus.  

“That’s what advent means-- “coming”.  Even God’s men who foretold the grace that was to come didn’t know “what person or time the Spirit of Christ in them was indicating” (v.11).  They were waiting, but they didn’t know what God’s salvation would look like…  

“We Christians on this side of Jesus’ birth are a God-blessed, happy people because we know God’s plan.  The centuries of waiting are over.  We have the greatest reason to celebrate.

“And yet we are still waiting.  Our spiritual redemption came to us with the baby of Bethlehem.  Nevertheless, as Romans 8 says, “we ourselves, who have the firstfruits of the Spirit, groan inwardly as we wait eagerly for adoption as sons, the redemption of our bodies” (v.23).  There is suffering and tragedy still, even for Christians.  Someone we love is dying.  We may be in pain.  Sometimes we have trouble believing God’s promises.  In other words, our redemption is not complete.  We are waiting for the redemption of our bodies--waiting for Jesus’ second advent, for him to come again.

“So here we stand in the middle.  Advent is a season of looking back, thinking how it must have been, waiting for the promised salvation of God, not knowing what to expect.  And at the same time, Advent is a season of looking ahead, preparing ourselves to meet Jesus at his Second Coming.”  

~Noel Piper, Treasuring God in Our Traditions (emphasis added)

A family Advent calendar is one way Noël's family keeps Christmas Christ-centered.  When my oldest child was 2, I made a calendar for our family, and it's the part of "getting ready for Christmas" our three kids are already looking forward to.  Our calendar hangs on a prominent wall in our house during the month of December, and is something personalized and unique to our family that we will cherish for years to come.  The best part is - it's PORTABLE!  Perfect for our sojourning lifestyle.  (This year we will be using it in New Zealand, as we visit my husband's family for Christmas.)


When I was getting ready to make my own calendar, I initially contacted Desiring God to see if they were still selling them (why reinvent the wheel?), but… alas, they’re not making them anymore.  

So, back to square one: making it myself.  I googled Noël’s calendar and found several sites with pictures, and also came across another creative mother who’s made one for her family and freely offers felt patterns and even DIY kits on her site(When I made my calendar 5 years ago her kits weren’t available, and I wanted to make a few changes to our own calendar anyway. I’m really happy with how ours turned out.)

Why couldn't this be the November you make an Advent Calendar for your own family?  Just follow my easy, step-by-step instructions in this series to create a beautiful, unique Advent Calendar your family will enjoy year after year.


Make Your Own Advent Calendar: Part 1


Getting Started…


1. Map out your Calendar on paper first.  Figure out the basic proportions of your finished manger scene compared to the storage section for the pieces. 

On our calendar, I put the title at the top, with space for the completed 25-piece manger scene underneath (the kids will place one piece each day).  At the bottom I left enough space to store all the pieces in rows.  Feel free to arrange your calendar any way you want to.


2. Next, print out the paper patterns and cut out enough pieces to see how they will fit on your background.  My initial end result looked a little crowded; in the end I cut my actual felt characters down a little smaller.


3. If you like, go ahead and make an initial list of the characters and the colors of felt you want to use for each one.  This will save time later and also give you an idea of how much of each felt color you will need.

4. Google “alphabet block pattern” and choose a simple style of lettering you like.  Print it out, and cut out paper patterns for the letters in the title: “The Christmas Story” to make sure all the letters will fit across your felt background piece.


Part 1 complete!  Great job!  

See you next week...

To read the next post in this series, click here… 

{For a copy of the Christmas story divided into 25 pieces, email me at carolyn@carolynbroughton.com}

*****

In the Comments:

How are you planning to celebrate the season of Advent as a family?  

Leave a comment with a description of an Advent memory, an idea for an Advent tradition, or an insight into the meaning of Advent.  I’d love for this post to become a collection of creative ideas for celebrating the season of Advent with your children! 


Let’s have fun together coming up with creative ways to keep Christ at the center of Christmas!